To add an environment variable for Python, like you want to set the directory where all your python scripts will be stored to be added directly at runtime, you need to set the environment variable. For that, follow the steps:-
1. Goto myComputer and right click onto that. Goto System Properties.
Now in properties, goto Advanced System Properties and in that dialog, select Advanced. Click on Environment Variables provided there.
In the system Variable Section, select New and then specify as:-
Variable Name: PYTHONPATH
Variable Value: <Path of your scripts folder where you store your scripts>
Click ok. Now close and restart the Python Shell. It will get that environment Variable.
You can check by typing the following commands:-
>>>import sys
>>>sys.path
It should contain the path of your directory which is set.
Monday, July 11, 2011
Thursday, June 16, 2011
Moving Buttons from left to right in Ubuntu
Ubuntu now default comes with mac style layout with minimize, maximize and close buttons on the left side and it is a problem for some as they don't like this layout. So we can change them from left to right using simple steps.
Step1:-
Press Alt+F2 to open the "Run Application" Dialog box.
In that, enter gconf-editor and press enter.

Step2:-
Now a window will come up having a list of options. From that, choose Apps and expand the dropdown.
Now from the dropdown list, goto "Metacity" and then click on "general" submenu in it.
Now on right hand side, you will get the list of many options. From that, select "Button_layout".
Double click on it and change its value to "menu:minimize,maximize,close"
Now click ok.
You will see that now the buttons are placed to the right of the opened windows or applications.
Thanks for reading the post.
Step1:-
Press Alt+F2 to open the "Run Application" Dialog box.
In that, enter gconf-editor and press enter.

Step2:-
Now a window will come up having a list of options. From that, choose Apps and expand the dropdown.
Now from the dropdown list, goto "Metacity" and then click on "general" submenu in it.
Now on right hand side, you will get the list of many options. From that, select "Button_layout".
Double click on it and change its value to "menu:minimize,maximize,close"
Now click ok.

You will see that now the buttons are placed to the right of the opened windows or applications.
Thanks for reading the post.
Monday, June 13, 2011
Add and remove users by command prompt.....
While doing our project, we came to a position where we needed to have abt 40-50 users in SAM database and to add them using GUI would be a very lengthy process.
So we decided to use command prompt.
All you have to do is to create a .BAT file and add the following command to it.
net user (username) (password) /add /comment:"Test user, DELETE ME"
net user Rahul abcd /add /comment:"Test user, DELETE ME"
So, add the user names and passwords below one by one and run the bat file. All will be added.
To remove them, again create a .bat file and use this command.
net user Rahul /delete
So, we just created the file, added 20-30 lines with username and password and got them added to database.
INTERESTING POINT:-
You can also create a prank with them.
1. Just create the bat file with 30-40 user list to be added.
2. Name it like game.bat or some other name so that other user clicks on it.
If he will click, all the accounts will be created on his computer. And you know the password as well.....
It will lead to so many accounts appearing at the time of login and will take a lot of time showing the login screen.
For removing them, you need to provide him the simple remove.bat file with remove command for all users and he can successfully remove all the user accounts.
Thanks for reading the post.... :)
Wednesday, March 2, 2011
How to dual boot Windows 7 with Ubuntu 10.10
In this blog post, i am going to tell you how to dual boot windows 7 with Ubuntu 10.10
There are two methods to install Ubuntu with Windows 7.
1. Install using WUBI Installer which comes with Ubuntu Live CD/DVD.
2. Install by booting from the Live CD/DVD.
First I am showing the partitions in my computer. I had only one partition with windows 7 installed in it. So I shrinked it and made a second partition.
Below is the view after i created a new drive to install Ubuntu.
Now the methods to install Ubuntu.
Method 1(Using Wubi Installer):-
1. Boot your computer uding windows 7. When you logon to the machine, insert the Ubuntu Live CD.
Double click on it and it will launch the Wubi Installer.
2. Select "Install Inside Windows" and click next.
You will get the screen as shown above. Just select the installation drive, provide the username and password and the installation size and the environment and it will automatically install Ubuntu with Windows 7.
Method 2(By booting from Live CD):-
1. Restart the computer and insert the Ubuntu live CD.
Boot from the CD.
Then select Install Ubuntu.
2. When it asks to Allocate drive space, then select "Specify pertitions manually".
3. Now see I have the partitions listed in the partition table. I will delete the one highlighted and create 3 partitions of it and install Ubuntu in them. So select it and delete it. It will be Unallocated now.
4. First partiton to be created is the "Root Partition". Select the unallocated space and select "add". Then specify the type as "Primary" and size as i specified to be 2.5 GB, location as "Beginning" and the mount point as "/". See the image below.
5. Create the next partition as "swap". I had assigned 776 MB RAM to VM. So i created a swap partition of twice or more than that of RAM. Try smaller one, if it works, then its ok...
6. Now create the "/Home" partition with the rest of the unallocated space. its the one where all your downloads and everything is stored.
7. Now your partitions are created. Here is the look of my partition table after creating the partitions.
8. Click Install Now. If you get a warning or error, then check it and correct the partition table entries. If it says some of the partition sizes is not correct, then correct them. Follow the order: First create "/", then "Swap" and then "/Home". Sometimes it gives error on not following this order.
Now next provide the details and it will be installed. Here is the look of the Grub on bootup.
And now i have Ubuntu installed along with Windows 7.......... :)
If you have any problem, then do ask here............ I will try to help as best as i can...... :)
Thursday, November 11, 2010
MAKE YOUR LIMITED ACCOUNT ADMIN VIA COMMAND PROMPT
To do so, you need to open the command prompt in admin mode..
Goto Programs -> Accessories -> cmd
Right click on it and select run as.
Select run as following user and provide the admin's username and password.
Now command prompt will open. In that add this command...
c:\..> net localgroup administrators /add
You have to add the account name in place of and then press enter.
Now Logoff and again login.
You will be administrator now...... :)
Goto Programs -> Accessories -> cmd
Right click on it and select run as.
Select run as following user and provide the admin's username and password.
Now command prompt will open. In that add this command...
c:\..> net localgroup administrators /add
You have to add the account name in place of
Now Logoff and again login.
You will be administrator now...... :)
SEND FILES THROUGH LAN IN XP
Here i am telling you the shortcut... try this its amazing....... :)
You need 2 computers to send file from one computer to another.
Don't try in Win 7 or Vista. Its removed from them....
No problem even if you are a Limited user...
Follow these steps:-
Goto C:\Program Files\NetMeeting
Now find conf.exe and doubleclick on it....
It will ask for install..
Click next.
Add name, last name and email id.... You can add any garbage....
Click Next and again Next.
Now in this pic as shown, select Local Area Network.
Click Next.
Uncheck both the options given....
Click Next-> Next -> Next until it finishes......
Now a screen as shown will appear...
Now even if you close it, you can now run it again by going to the same folder and clicking conf.exe . Now it will not ask for settings again and will start from here.
On the second computer, do the same thing.
One important thing to keep in mind.....
The default path for storing the transferred files is in "C:\Program Files\NetMeeting\ Receieved Files". As this is a "limited" account, and by default this folder is not there, so either create this folder by using "command prompt" in "Admin mode" or follow the steps given below. As I know some of you will create error in creating folder through command prompt, so use the below steps to change the folder location...
Goto tools tab and select "file transfer".
Now in this window, goto File and select change folder. Select "my documents" folder of your limited account.
Now you are done....
Run the conf.exe on both the computers simultaneously...
Then Enter the IP of other computer as shown and press "Enter".
Now the other will receive a call. Pickup the call...
Now you are connected...
Once you are connected, you can transfer files.......
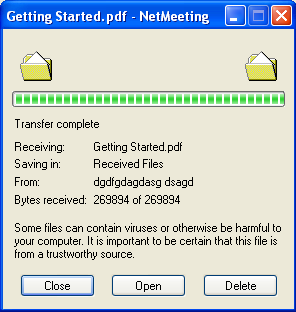
Now the person who wants to send the file, just click on the bottom Right button.
A dialog box as shown will appear.
Now after adding files, click on send to all...
It will send to all....
You will receive it on other computer...
Now you can close it...
So no need to have admin account... just need to change the received files folder...
You can also directly run it by typing conf.exe in "Run". But don't use it as it remains there and anyone can see what you have tried to run......
Thats it. Now you can share anything to anyone..... :)
Wednesday, November 10, 2010
Perform Administrative tasks using command prompt......
If we are logged in to standard user account and we want to enable or disable a device from the device management console, se switch accounts, log in as administrator and then change the settings. But this can decrease the performance of your computer making it unable to respond for some time. So here i am going to show you another method through command prompt of standard user, using which you can easily enable or disable the devices. Remember that we need to know the administrator accounts password.
Steps to be followed:-
Now the command prompt will get opened with admin mode....
Now type mmc devmgmt.msc
This will open the management console in admin mode...
Now enable or disable whatever you want to do.....
Now you don't have to login as admin!!!! It's this much simple........
thank you for reading my post......... :)
Steps to be followed:-
- Goto Start -> Programs -> Accessories.
- Right Click on Command Prompt and select run as.
- Now select "the following user" and provide the username and password of adminstrator account.
Now the command prompt will get opened with admin mode....
Now type mmc devmgmt.msc
This will open the management console in admin mode...
Now enable or disable whatever you want to do.....
Now you don't have to login as admin!!!! It's this much simple........
thank you for reading my post......... :)
Subscribe to:
Posts (Atom)