Saturday, December 3, 2011

Internet Sharing using ICS

One can share the internet with his friends using the Internet Connection Sharing option available in Windows.
Follow the below steps to share your internet:-

SERVER CONFIGURATION:-

Step1:-
On the server, you need to have 2 network adapters, one for LAN and the other one for Internet.

Step 2:-
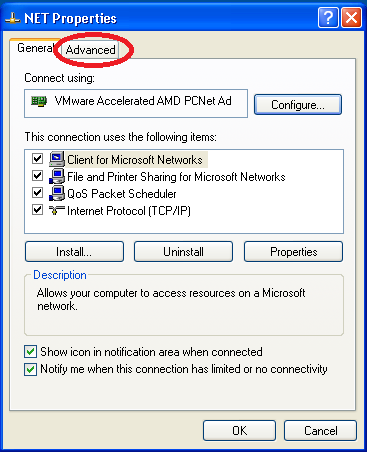
You need to share the internet of the adapter which is directly connected to Internet. Here its the adapter with name "NET". Right click on it, and goto properties.

Step 3:-
Now in properties, click on the advanced tab.

Step 4:-
Now in this, you will see the option of "Internet connection sharing". Select it and click "Ok".

Note that after you click OK, the IP address of LAN will be reset to 192.168.0.1/24 . So you need to change the IP address of LAN as per your address.


CLIENT COFIGURATION:-

Step 1:-
Goto the remote machine which wants to access internet via server. Open its network adapter properties.

Step2:-
Now in this, enter the IP address of server at 2 locations:- One at Gateway and other at DNS server.
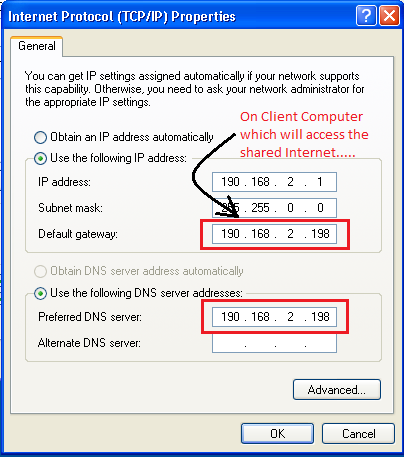
Click OK.

Now you will be able to access internet directly without needing to enter the proxy. Remove the proxy settings if you have entered them in web browser.

TRICK:-
I have used this method a lot at hostel to get internet from my friends. I was in NBH and I used to download a lot of stuff using this. They don't know about this. So I used to modify the settings of their server and access internet from them. They couldn't find me and they thought that their internet has gone slow. There were 4-5 servers there and I had used net from each one of them. I loved being there as each one had atleast 600 Kbps connection and I used to get internet from each one of them. I would run 2,3 virtual machines and would use different server in each of them. Then I was able to download different stuff from different servers. So virtually I was having a net connection of about 5 Mbps of my own.... :). I used download a lot of stuff using this. Its a nice trick.... :)

Thursday, December 1, 2011

Create bootable windows 7 pendrive from "Customized Windows 7 image"

For creating a bootable pendrive of customized version of windows 7(image modified containing pre-configured softwares and settings), the steps change a bit.

First five steps are same. For them, refer the following article: http://learnwithrahul.blogspot.com/2011/12/how-to-create-bootable-windows-7.html

Sixth step changes for the customized images. You need to mount the customized windows 7 image. Now explore it and find the directory containing bootsect.exe.

Now navigate to that directory from command prompt in administrative mode and fire the command:-
bootsect /nt60 I:
(Where I: is the drive letter of pendrive)

Next steps are the same.

How to create bootable windows 7 pendrive for installation

For creating a bootable windows 7 pendrive, here are the Pre-requisites.

1. Windows 7 DVD or image.
2. If image available, then tool to mount the image, like "virtual clone drive" or "daemon tools".
3. Pendrive of size greater than the size of windows 7 DVD or image.

Creating Bootable Windows 7 pendrive:-

Step1:- 
Open Command prompt with administrative privileges. Goto Start->Accessories->Command Prompt->Run as Administrator

Step 2:-
Enter "Diskpart" in command prompt. It will load the diskpart utility in the command prompt.

Step 3:-
Enter the command "List Disk". It will list all the available disks with their numbers. In the diagram below, the number of my USB Drive is 2.
Enter the command "Select disk <disk_no>" where disk_no is the number of the disk. As per the example below, its "select disk 2".

Step 4:-
Now "Clean" the disk. Also make it primary partition. For that fire the command "Create partition primary". Now mark the drive as "ACTIVE" and format it keeping the filesystem to NTFS. See the diagram below:-

Format the partition by entering the command "format fs=NTFS"


Step 5:-
Now assign a name to drive by entering the command "ASSIGN" and then exit from the diskpart utility. Don't close the command prompt.

Step 6:-
Now insert the Windows 7 DVD or mount the image of windows7. Note down the drive name. In my case, my windows 7 DVD Drive is 'K'. So now navigate to K:/boot folder. Also note down the drive letter of the pendrive. In my case, it is 'I'. Now enter the command:-

K:\Boot> bootsect /nt60 I:

(Where I: is the USB/Pen Drive)

Step 7:-
Now copy all the contents of windows 7 DVD to pendrive. You now have a bootable pendrive ready.

Tuesday, November 22, 2011

How to increase trial period of Windows 7 or Windows Server 2008

Usually Windows 7 comes with a default trial period of 30 days. People don't know that it can be extended upto 120 days. So I am going to discuss about that.

Windows manage the license of Windows 7 or Windows Server 2008 using a tool called "Software Licensing Management Tool". Its a vb script whose default location is "C:\Windows\System32" and is a file named "slmgr.vbs". SLMGR itself stands for Software Licensing Manager.

If you want to see the activation status of your machine, just run the following command either in command prompt or in Run and type the following words: "slmgr.vbs /dlv"


Now you will get the detailed description about your license.


If you want to see all the parameters accepted by slmgr.vbs, then  instead of /dlv, just type slmgr.vbs in RUN and you will get all the options listed in the prompt which will come.

How to increase the trial period to 120 days?

One thing is to be noted as seen on the above picture, there is something called "Windows rearm count" listed with some figure in front of it. This is the matter of interest.

Actually Windows provide you 3 rearm counts. When you perform fresh installation of windows, the rearm count is set to 3 and a trial period of 30 days is given to you. On the completion of trial period, you are asked to either activate or you can increase the trial period.

For increasing the trial period, you need to perform the following steps:-

1. Open Command Prompt in Administrative mode, i.e., "Run As Administrator"


2. Now type the following command in the command prompt:-    "slmgr -rearm"


On successfull run of the command, a dialog box will appear asking user to restart the machine. On restarting, you will see your trial period renewed by 30 days.

This command you can run for a max. of 3 times, ie 30 days(initial) + 30*3 = 120 days of trial period of windows.

If you want to know how many rearm counts are remaining, then run the command in RUN "slmgr.vbs /dlv" and you will get the rearm count in the information displayed as shown in the second diagram above. Note that there is gap in between "slmgr.vbs" and "/dlv".

Thanks for reading..... :)
If you have any queries, then do ask. I would be happy to help.

Monday, November 21, 2011

Installing and Configuring RSH on Linux

I installed and configured RSH on CentOS release 5.5 . The steps would be almost same for all the other linux distros.

First you need to have xinetd installed. For that fire the following command:-

user@centos# yum install xinetd

Once its installed, you need to install rsh-server onto your machine. For that enter the following command:-

user@centos# yum install rsh-server

Now you need to Edit /root/.rhosts to add lists of hosts that can access without password. If you want to allow access to everyone without password, you need to put '+' in the file. A '+' indicates allowing everyone.
To do this, you can either modify the file by opening it or just enter the following command:-

user@centos# echo + > /root/.rhosts

Now you need to modify the permissions of .rhosts file. Enter the following command:-

user@centos# chmod 600 /root/.rhosts


Now you need to allow RSH , RLogin and Rexec to be used. For that you need to modify the /etc/xinetd.d/rsh , /etc/xinetd.d/rlogin  and /etc/xinetd.d/rexec file. Open these files one by one and then set the "disable=no"

Here is an example for modifying the rsh file:-

user@centos# vi /etc/xinetd.d/rsh


Similarly do for the rlogin and rexec file.
Once these are done, now you need to modify the /etc/pam.d/rsh file to allow passwordless rsh to the machine.

You need to modify the following line:-

     BEFORE: auth    required        pam_rhosts_auth.so
     AFTER : auth    required        pam_rhosts_auth.so promiscuous
Now you are done. You need to restart the xinetd service.
 
user@centos# /etc/init.d/xinetd restart
Now run the rsh command with the other commands and you will be able to successfully
execute them.
 If there are any warnings or errors as you are trying to access using the root 
privileges, then you need to modify the /etc/securetty file. Add rsh and rlogin 
to the bottom of that file.
Now you would be able to successfully perform rsh to the machine. 

Monday, November 14, 2011

Package required to make calls from "Lua" to "C" and vice-versa

Lua provides the facility to make calls to C programs and also has the ability to be called from the C program.

I got a problem of being unable to get the required liblua5.1.so files which are essential for this type of communication to happen. So I finally found out what package I need to install to get this working.

One needs to install the "liblua5.1-dev" package and with this all the required files will be updated. You just need to fire this command:-

rahul@ubuntu32$ sudo apt-get install liblua5.1-dev

Once its installed, you can see the path of all the shared libraries "liblua5.1.so" by running the following commands:-

rahul@ubuntu32$ sudo updatedb
rahul@ubuntu32$ locate liblua | less

If you want to get the path of lua.h file, fire the command:-

rahul@ubuntu32$ sudo updatedb
rahul@ubuntu32$ locate /lua.h

Now you have the path of Include files and the shared libraries. Just create the shared library from the "C" program and then run the lua program. You would be able to call C program from the lua program.

A nice tutorial about this is given on the website "http://www.troubleshooters.com/codecorn/lua/lua_lua_calls_c.htm". Do have a look there for more details.


Wednesday, November 9, 2011

Installing Lua on Linux

For installation, download the binaries, build them and install them. The steps for building and installing are listed below.

Download the Lua binaries from the site:-
1. Download the source: http://www.lua.org/ftp/lua-5.1.4.tar.gz
2. Extract the tar ball
3. Run this command from lua-5.1.4 directory: "make linux test"
------------------------------------------------------------------------------------------------------------------------
If you get an error that readline or history.h not found, then try installing the following package:-

sudo apt-get install libreadline6-dev
------------------------------------------------------------------------------------------------------------------------
To check what files exist in a package, use the following command:-
dpkg-query -L <package name>
Like:-
dpkg-query -L libreadline6

If you don’t find any header files and only .so files, then it means you are having the shared libraries and not the source. So you need to install the source files as well.

------------------------------------------------------------------------------------------------------------------------
To get the list of packages and their names if you don’t know, then one can search using the following command:-
sudo apt-get cache search readline

This will give you the list of all the packages containing the name readline
------------------------------------------------------------------------------------------------------------------------

How to build and install binaries from the package:-
Once the binaries are downloaded and the command “make linux test” is run, you need to now install the generated files.

For that enter the following command:-
sudo make install

This will install the Lua binaries to the required path.

Now you can run the files using the terminal.
user@ubuntu32$ which lua
/usr/local/bin/lua
user@ubuntu32$ lua
>

Wednesday, October 12, 2011

Some interesting facts about windows 8


To understand this article, you first need to know few things…..

First one is about UEFI(Unified Extensible Firmware Interface) which is nothing but the replacement to the traditional BIOS which has started to occur.

One can have a good knowledge about it from the following link…. It’s a good link to know about UEFI.

Important Point:-
One feature of UEFI is that it allows firmware to implement Security Policies.

Now why is this UEFI important???
UEFI secure boot is part of Windows 8 secured boot architecture
So, when windows 8 will be launched, the laptops which will be coming with pre-installed Windows 8 will have UEFI instead of traditional BIOS.

Here is a nice article about the boot process of win8:-

So why to be concerned??
·          
      Windows 8 utilizes secure boot to ensure that the pre-OS environment is secure
·         Secure boot doesn’t “lock out” operating system loaders, but is a policy that allows firmware to validate authenticity of components

Usually if we have a laptop with windows installed on it and want to install Linux on it, then we simply either format or create new drive and install Linux onto that. And then it modifies the Boot Loader/System Loader and we get both the OS working.

But with PC’s having Windows 8 installed, if you have UEFI instead of BIOS, you won’t be able to do so. As it now uses UEFI and it has security policies configured which will prevent you from booting any other OS than the authorized ones.

Microsoft can require that hardware vendors include their keys (for secure booting). Their competition can't. A system that ships with Microsoft's signing keys and no others will be unable to perform secure boot of any operating system other than Microsoft's. No other vendor has the same position of power over the hardware vendors. Red Hat is unable to ensure that every OEM carries their signing key. Nor is Canonical. Nor is Nvidia, or AMD or any other PC component manufacturer. Microsoft's influence here is greater than even Intel's.

Linux has no support for UEFI by now and it would be an issue for linux to add support for it as soon as possible and also make vendors to add their certificates in the authorized list.

Here is a nice article on this topic:-

Monday, October 10, 2011

Disable top bar while running VMPlayer in fullscreen mode

Hi, In this post I am going to tell you how to disable the vmplayer's top bar which appears when we run the vmplayer in fullscreen mode.

For windows systems:-

All you have to do is to edit the preferences.ini file.

My user account has the name "rahul". So I had the file located at "C:\Users\Rahul\AppData\Roaming\VMware"

Open this file and add the following line to it:-

pref.vmplayer.fullscreen.nobar="TRUE"

For Linux systems:-

Find preferences at location "/home/user/.vmware/preferences"

So just type following command and add the line to that file:-

user@ubuntu32$ vi /home/user/.vmware/preferences

Add the following line to the file:-
 
pref.vmplayer.fullscreen.nobar="TRUE"

Save it and now run a vm in vmplayer in fullscreen. You will not see the top bar.

If you see an error or the bar not disappearing, then see the vmware.log file for detailed description on the error which occurred.

Wednesday, September 28, 2011

Creating local git repository server

I tried to setup a local git code repository for managing the code and had some issues with gitosis. Finally I came up with a much simpler way to create a git repository and host it on the local server.

One can follow the steps as listed below and can setup a local git server. I used Ubuntu 10.04 for this and also tried on Ubuntu server 10.04 and it works on both.

First thing you need to do is to install git on your system. For that simply run this command:-

user@ubuntu32$ sudo apt-get install git-core

Now git is installed onto your system. Now create a directory in which you will keep your code:-

user@ubuntu32$ mkdir git_repo  
user@ubuntu32$ cd git_repo
user@ubuntu32:`/git_repo$ git init

Now add all the project files into the directory. I copied all the files I want to add to the repository.

user@ubuntu32:`/git_repo$ cp -r /home/user/projectA/* /home/user/git_repo

Now we need to add the files...

user@ubuntu32:`/git_repo$ git add .

Now we need to commit the changes. For that enter this command:-

user@ubuntu32:`/git_repo$ git commit -a -m "My first commit"

Now your files are added to the git repository.

Now to create a hosted repository of this source code, perform the following actions:-
First you need to copy the .git contents which can be checked out at later stages by users for cloning the directory. So enter the following command:-

user@ubuntu32:`/git_repo$ cp -r /home/user/git_repo/.git  /home/user/hostedgitrepos/git_repo.git

Now your universal git repository is git_repo.git and you can clone it from any machine. You just need to have access to that machine and rights to access them.

You can clone it on other machine using the following command:-

aa@fed$ git clone user@<server_machine_name_or_ip>:/home/user/hostedgitrepos/git_repo.git

Now you will see the directory cloned onto your machine.

Similarly one can push the changes to the git repository or can pull the updated source code in the same fashion. 

Thanks for reading..... :)

Tuesday, September 27, 2011

How to attach DVD Drive to a VM using Python(For Xen)

In this post I am going to tell you how to attach a DVD Drive to a newly created VM in Python. I faced a lot of challenges in determining how to attach a DVD Drive. Finally I found out a way.

We need to use the following code:-

Here, VM_ref refers to the uuid of newly created VM to which we want to add the DVD Drive. Every physical DVD Drive has its VDI which is stored in its properties and one can get it and pass it as one of the parameters to create a VBD linking DVD Drive with the VM. 

Sunday, September 25, 2011

Seagate Service Center In Pune

People face a lot of difficulties in finding the seagate center in Pune as no proper information is available. So I am going to update the information with the exact location of the facility.

Seagate hard_disks are serviced by a firm called "Accel Frontline" which provides the services to Seagate.
The seagate replacement office is situated near Corporation(Manpa) near the District court. In front of the Distric court, there is a Gas Agency. On the second floor of that building is the Seagate's repairing office.


Before going to the office there, you need to register to the Accel Frontline's website.

http://myservice.accelwms.in/

After registering at the website, you will get a customer ID which you need to provide when you are returning the defected HDD.

Kindly note that this information is correct as per on 25th September 2011. So its the updated information.

Also, all kinds of HDD repairs, RAM repairs are done at this office only.

Wednesday, August 24, 2011

Using tftp in Ubuntu 10.10

I tried to use tftp in ubuntu 11.04 but it was giving error. Maybe the support for ubuntu at the time of writing this blog is not available. So I tried using tftp in ubuntu 10.10 and it worked. So what you need to use tftp.

First you need to install tftp. For that use this command:-
$sudo apt-get install tftpd-hpa

Now the default directory which will be accessed while doing tftp to the server is having location address as :-
/var/lib/tftpboot
You can get this address by viewing the contents of tftpd-hpa file present at location "/etc/default/tftpd-hpa"

Now add all the files which you want to be accessed via tftp in this directory. This directory will appear as the parent directory.
Make sure you have given proper permissions to the files to be accessed.

Now simply goto command prompt and type "tftp <server_ip_address>" like "tftp localhost"
Now you will get a prompt as "tftp>""
Here you can write the commands.

For getting the file, type "get <filename_on_server>  <filename_to_be_used_o_client>" like:-
tftp> get rahul.txt new.txt

Now this file will be copied to you computer. It will be in the directory in which you are currently in. I.E. when you do tftp <host>, the directory in which you are there at that time, the file is copied to that directory.

Similarly to put the files on the tftp server, you need to use the command "put "filename" "server_path" "

To exit from the tftp command prompt, simply type "quit" and you will exit from it.

One thing to be kept in mind is that the path for tftp server starts from the tftpboot directory. So if you have rr directory inside tftpboot directory and want to access any file inside rr, then you have to specify the path as /rr/<filename>. Therefore, the default path starts from the tftpboot directory.

If you have any queries, then do comment, I would be happy to help...... :)

Tuesday, August 23, 2011

How to enable DHCP in Ubuntu 11.04

For DHCP, you will need to first install DHCP3-SERVER.
Open terminal and write "sudo apt-get install dhcp3-server

Once its installed, you need to check in few things:-
If your system is having more than one NIC, then you need to specify which nic is to be used for the DHCP service.
For that, type "sudo vi /etc/default/isc-dhcp-server"

Now in this, goto the line 'INTERFACES="" ' and enter the name of ethernet you want to use for dhcp there..... like 'INTERFACES="eth0" '

Now if your network adapter is getting IP via some other DHCP server, then you need to specify the subnet mask. So for that you need to modify the dhcpd.conf file. For that type "sudo vi /etc/dhcp/dhcpd.conf"
In that add this line "subnet <ip address> netmask <netmask_value>{} " like "subnet 192.168.233.129 netmask 255.255.255.0 {}"

Now restart the dhcp server and you will have it running. Type "/etc/init.d/isc-dhcp-server restart"

Now your dhcp server is running. You need to provide range that can be allocated in the dhcpd.conf file.....

Friday, August 12, 2011

VM creation using Python for XenServer

I tried for 4-5 days to create a VM for XenServer using Python and finally I am able to create a VM for XEN. Here I am going to tell you the basic steps needed to be performed to do the operations.

VM creation involves 3 things in common.
1. Creation of VM.
2. Creation of disk referred as VDI.
3. Creation of VBD which acts as a link between VM and Disk.
(Network card is the other optional thing which can be added.. for that you need VIF)

So, In the code, I have first created a Disk, then created a VM, and then passed both as parameters while creating VBD which will attach Disk to the VM. Here is the code:-

Monday, July 11, 2011

How to add environment variables for Python

To add an environment variable for Python, like you want to set the directory where all your python scripts will be stored to be added directly at runtime, you need to set the environment variable. For that, follow the steps:-

1. Goto myComputer and right click onto that. Goto System Properties.


Now in properties, goto Advanced System Properties and in that dialog, select Advanced. Click on Environment Variables provided there.


In the system Variable Section, select New and then specify as:-
Variable Name: PYTHONPATH
Variable Value: <Path of your scripts folder where you store your scripts>


Click ok. Now close and restart the Python Shell. It will get that environment Variable.

You can check by typing the following commands:-
>>>import sys
>>>sys.path

It should contain the path of your directory which is set.

Thursday, June 16, 2011

Moving Buttons from left to right in Ubuntu

Ubuntu now default comes with mac style layout with minimize, maximize and close buttons on the left side and it is a problem for some as they don't like this layout. So we can change them from left to right using simple steps.

Step1:-
Press Alt+F2 to open the "Run Application" Dialog box.
In that, enter gconf-editor and press enter.


Step2:-
Now a window will come up having a list of options. From that, choose Apps and expand the dropdown.
Now from the dropdown list, goto "Metacity" and then click on "general" submenu in it.
Now on right hand side, you will get the list of many options. From that, select "Button_layout".
Double click on it and change its value to "menu:minimize,maximize,close"
Now click ok.

You will see that now the buttons are placed to the right of the opened windows or applications.

Thanks for reading the post.

Monday, June 13, 2011

Add and remove users by command prompt.....

While doing our project, we came to a position where we needed to have abt 40-50 users in SAM database and to add them using GUI would be a very lengthy process.

So we decided to use command prompt.

All you have to do is to create a .BAT file and add the following command to it.

net user (username) (password) /add /comment:"Test user, DELETE ME"
net user Rahul abcd /add /comment:"Test user, DELETE ME"

So, add the user names and passwords below one by one and run the bat file. All will be added.

To remove them, again create a .bat file and use this command.

net user Rahul /delete

So, we just created the file, added 20-30 lines with username and password and got them added to database.

INTERESTING POINT:-
You can also create a prank with them.
1. Just create the bat file with 30-40 user list to be added.
2. Name it like game.bat or some other name so that other user clicks on it.
If he will click, all the accounts will be created on his computer. And you know the password as well.....

It will lead to so many accounts appearing at the time of login and will take a lot of time showing the login screen.

For removing them, you need to provide him the simple remove.bat file with remove command for all users and he can successfully remove all the user accounts.

Thanks for reading the post.... :)

Wednesday, March 2, 2011

How to dual boot Windows 7 with Ubuntu 10.10

In this blog post, i am going to tell you how to dual boot windows 7 with Ubuntu 10.10

There are two methods to install Ubuntu with Windows 7.
1. Install using WUBI Installer which comes with Ubuntu Live CD/DVD.
2. Install by booting from the Live CD/DVD.

First I am showing the partitions in my computer. I had only one partition with windows 7 installed in it. So I shrinked it and made a second partition.


 Below is the view after i created a new drive to install Ubuntu.


Now the methods to install Ubuntu.

Method 1(Using Wubi Installer):-
1. Boot your computer uding windows 7. When you logon to the machine, insert the Ubuntu Live CD.
    Double click on it and it will launch the Wubi Installer.


2. Select "Install Inside Windows" and click next.
 

You will get the screen as shown above. Just select the installation drive, provide the username and password and the installation size and the environment and it will automatically install Ubuntu with Windows 7.

Method 2(By booting from Live CD):-
1. Restart the computer and insert the Ubuntu live CD.
    Boot from the CD.
    Then select Install Ubuntu.

2. When it asks to Allocate drive space, then select "Specify pertitions manually".


3. Now see I have the partitions listed in the partition table. I will delete the one highlighted and create 3 partitions of it and install Ubuntu in them. So select it and delete it. It will be Unallocated now.


4. First partiton to be created is the "Root Partition". Select the unallocated space and select "add". Then specify the type as "Primary" and size as i specified to be 2.5 GB, location as "Beginning" and the mount point as "/".  See the image below.


5. Create the next partition as "swap". I had assigned 776 MB RAM to VM. So i created a swap partition of twice or more than that of RAM. Try smaller one, if it works, then its ok...


6. Now create the "/Home" partition with the rest of the unallocated space. its the one where all your downloads and everything is stored.


7. Now your partitions are created. Here is the look of my partition table after creating the partitions.


8. Click Install Now. If you get a warning or error, then check it and correct the partition table entries. If it says some of the partition sizes is not correct, then correct them. Follow the order: First create "/", then "Swap" and then "/Home". Sometimes it gives error on not following this order.

Now next provide the details and it will be installed. Here is the look of the Grub on bootup.


And now i have Ubuntu installed along with Windows 7.......... :)


If you have any problem, then do ask here............ I will try to help as best as i can...... :)