Usually Windows 7 comes with a default trial period of 30 days. People don't know that it can be extended upto 120 days. So I am going to discuss about that.
Windows manage the license of Windows 7 or Windows Server 2008 using a tool called "Software Licensing Management Tool". Its a vb script whose default location is "C:\Windows\System32" and is a file named "slmgr.vbs". SLMGR itself stands for Software Licensing Manager.
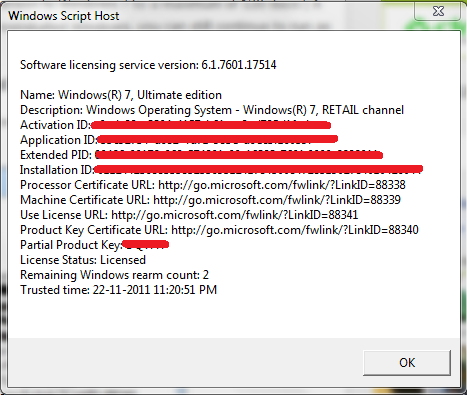
If you want to see the activation status of your machine, just run the following command either in command prompt or in Run and type the following words: "slmgr.vbs /dlv"

Now you will get the detailed description about your license.
If you want to see all the parameters accepted by slmgr.vbs, then instead of /dlv, just type slmgr.vbs in RUN and you will get all the options listed in the prompt which will come.
How to increase the trial period to 120 days?
One thing is to be noted as seen on the above picture, there is something called "Windows rearm count" listed with some figure in front of it. This is the matter of interest.
Actually Windows provide you 3 rearm counts. When you perform fresh installation of windows, the rearm count is set to 3 and a trial period of 30 days is given to you. On the completion of trial period, you are asked to either activate or you can increase the trial period.
For increasing the trial period, you need to perform the following steps:-
1. Open Command Prompt in Administrative mode, i.e., "Run As Administrator"

2. Now type the following command in the command prompt:- "slmgr -rearm"
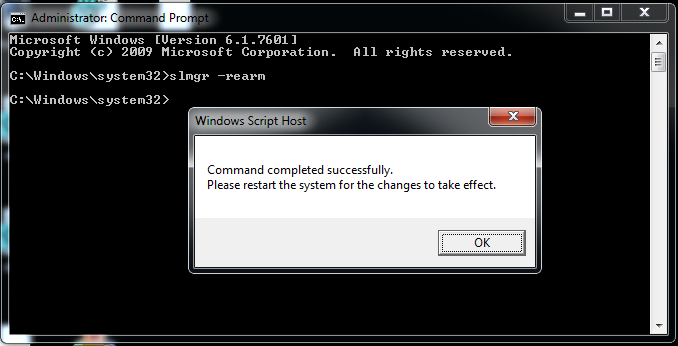
On successfull run of the command, a dialog box will appear asking user to restart the machine. On restarting, you will see your trial period renewed by 30 days.
This command you can run for a max. of 3 times, ie 30 days(initial) + 30*3 = 120 days of trial period of windows.
If you want to know how many rearm counts are remaining, then run the command in RUN "slmgr.vbs /dlv" and you will get the rearm count in the information displayed as shown in the second diagram above. Note that there is gap in between "slmgr.vbs" and "/dlv".
Thanks for reading..... :)
If you have any queries, then do ask. I would be happy to help.
Windows manage the license of Windows 7 or Windows Server 2008 using a tool called "Software Licensing Management Tool". Its a vb script whose default location is "C:\Windows\System32" and is a file named "slmgr.vbs". SLMGR itself stands for Software Licensing Manager.
If you want to see the activation status of your machine, just run the following command either in command prompt or in Run and type the following words: "slmgr.vbs /dlv"
Now you will get the detailed description about your license.
If you want to see all the parameters accepted by slmgr.vbs, then instead of /dlv, just type slmgr.vbs in RUN and you will get all the options listed in the prompt which will come.
How to increase the trial period to 120 days?
One thing is to be noted as seen on the above picture, there is something called "Windows rearm count" listed with some figure in front of it. This is the matter of interest.
Actually Windows provide you 3 rearm counts. When you perform fresh installation of windows, the rearm count is set to 3 and a trial period of 30 days is given to you. On the completion of trial period, you are asked to either activate or you can increase the trial period.
For increasing the trial period, you need to perform the following steps:-
1. Open Command Prompt in Administrative mode, i.e., "Run As Administrator"
2. Now type the following command in the command prompt:- "slmgr -rearm"
On successfull run of the command, a dialog box will appear asking user to restart the machine. On restarting, you will see your trial period renewed by 30 days.
This command you can run for a max. of 3 times, ie 30 days(initial) + 30*3 = 120 days of trial period of windows.
If you want to know how many rearm counts are remaining, then run the command in RUN "slmgr.vbs /dlv" and you will get the rearm count in the information displayed as shown in the second diagram above. Note that there is gap in between "slmgr.vbs" and "/dlv".
Thanks for reading..... :)
If you have any queries, then do ask. I would be happy to help.