I installed and configured RSH on CentOS release 5.5 . The steps would be almost same for all the other linux distros.
First you need to have xinetd installed. For that fire the following command:-
user@centos# yum install xinetd
Once its installed, you need to install rsh-server onto your machine. For that enter the following command:-
user@centos# yum install rsh-server
Now you need to Edit /root/.rhosts to add lists of hosts that can access without password. If you want to allow access to everyone without password, you need to put '+' in the file. A '+' indicates allowing everyone.
To do this, you can either modify the file by opening it or just enter the following command:-
user@centos# echo + > /root/.rhosts
Now you need to modify the permissions of .rhosts file. Enter the following command:-
user@centos# chmod 600 /root/.rhosts

Now you need to allow RSH , RLogin and Rexec to be used. For that you need to modify the /etc/xinetd.d/rsh , /etc/xinetd.d/rlogin and /etc/xinetd.d/rexec file. Open these files one by one and then set the "disable=no"
Here is an example for modifying the rsh file:-
user@centos# vi /etc/xinetd.d/rsh
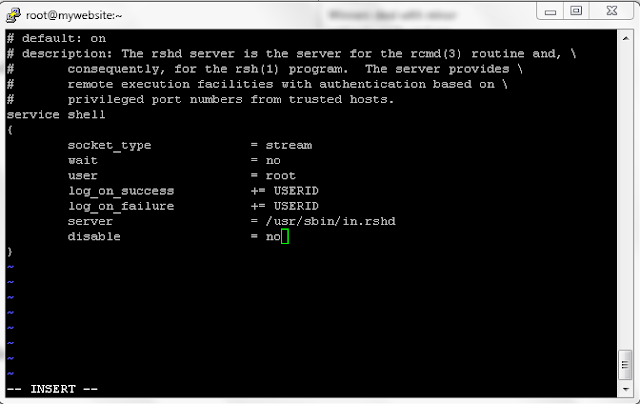
Similarly do for the rlogin and rexec file.
Once these are done, now you need to modify the /etc/pam.d/rsh file to allow passwordless rsh to the machine.
You need to modify the following line:-


First you need to have xinetd installed. For that fire the following command:-
user@centos# yum install xinetd
Once its installed, you need to install rsh-server onto your machine. For that enter the following command:-
user@centos# yum install rsh-server
Now you need to Edit /root/.rhosts to add lists of hosts that can access without password. If you want to allow access to everyone without password, you need to put '+' in the file. A '+' indicates allowing everyone.
To do this, you can either modify the file by opening it or just enter the following command:-
user@centos# echo + > /root/.rhosts
Now you need to modify the permissions of .rhosts file. Enter the following command:-
user@centos# chmod 600 /root/.rhosts

Now you need to allow RSH , RLogin and Rexec to be used. For that you need to modify the /etc/xinetd.d/rsh , /etc/xinetd.d/rlogin and /etc/xinetd.d/rexec file. Open these files one by one and then set the "disable=no"
Here is an example for modifying the rsh file:-
user@centos# vi /etc/xinetd.d/rsh
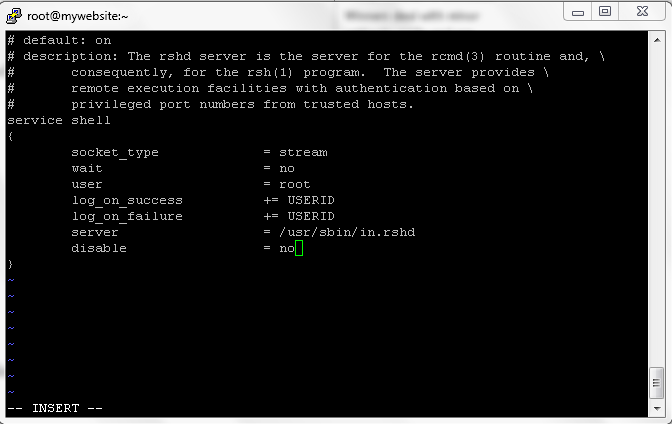
Similarly do for the rlogin and rexec file.
Once these are done, now you need to modify the /etc/pam.d/rsh file to allow passwordless rsh to the machine.
You need to modify the following line:-
     BEFORE: auth    required        pam_rhosts_auth.so
     AFTER : auth    required        pam_rhosts_auth.so promiscuous
Now you are done. You need to restart the xinetd service.
user@centos# /etc/init.d/xinetd restart

Now run the rsh command with the other commands and you will be able to successfully
execute them.

If there are any warnings or errors as you are trying to access using the root
privileges, then you need to modify the /etc/securetty file. Add rsh and rlogin
to the bottom of that file.
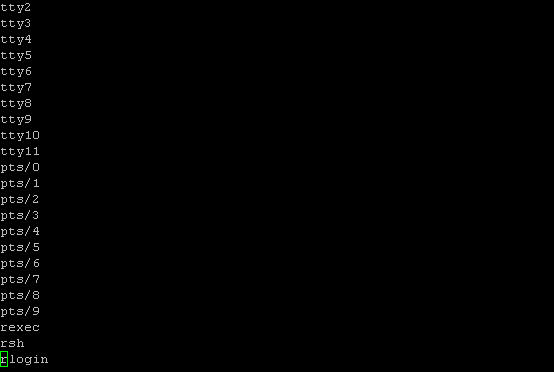
Now you would be able to successfully perform rsh to the machine.

