Showing posts with label vmware. Show all posts

Thursday, January 24, 2013

Fun with ESX: Learning about Bridge in Linux using VMs

Linux kernel has an inbuilt support for providing switching capability. In this post, I am going to define a simple a simple network to setup and then create the same using Linux VMs on ESX host.

Problem definition:-
Create a basic bridge(switch) and allow communication between the two VMs connected to that switch/bridge. In this, the switch will be created on a VM. Below mentioned diagram lists the network setup details:-

Requirements:-
Since we are using ESX host as the hypervisor, we need an ESX host to run the virtual machines, and 3 linux virtual machines on it. 

Machine(Bridge VM) which will act as bridge:-
This VM needs to have 2 vnics.

Rest 2 Traffic VMs(VM1 and VM2):- 
These VMs need to have atleast one vnic.

Setup Part:-
 Create 3 VMs on the ESX host. Below is the snapshot from my setup:-


Next install bridge-utils on the bridge-vm(Switch_Test VM as per my setup). These bridge-utils provide the functionality to create/delete/modify the virtual switches on the linux host.

 root@switch-test# apt-get install bridge-utils  

Now make sure that no ip-address is assigned to the two nics of switch-vm. Instead provide the following config in "/etc/network/interfaces" file(my linux OS is ubuntu).

 # The loopback network interface  
 auto lo  
 idace lo inet loopback  
   
 auto eth0  
 iface eth0 inet manual  
   
 auto eth1  
 iface eth1 inet manual  

Once this is done, you need to create your first switch. You can create that using the following commands:-

 root@switch-test# brctl addbr br0  

For more details, see the manpage of brctl.

Now you need to add the two nics of switch-vm to the bridge.
 root@switch-test# brctl addif br0 eth0  
 root@switch-test# brctl addif br0 eth1  

Now you need to zero-ip the interfaces added.
 root@switch-test# ifconfig eth0 0.0.0.0  
 root@switch-test# ifconfig eth1 0.0.0.0  

Once added, you need to bring up the br0.
 root@switch-test# ip link br0 up
 OR
 root@switch-test# ifconfig br0 up

Once done, your bridge is ready. You just need to plug the machines as mentioned in the setup diagram(problem statement diagram).

Main challenge here is to have the TrafficVM's connected to the individual nic of switch and making sure they cannot talk with each other directly. To do this, I have created 2 port-groups, each having separate VLAN and then applied them to the VM's vnics. Mentioned below is the pic of vswitch network on ESX host.


Simplifying the above network connectivity diagram, I have a network setup as depicted in the diagram below:-
Make sure that both the port-groups created are in promiscous mode, otherwise packets will not reach to the interfaces of switch-vm.

Now assign IP addresses to VM1 and VM2 such that they both are in the same subnet. Send a ping from VM1 to VM2. You will be able to communicate from VM1 to VM2 and vice-versa via switch running inside switch-vm.


Tuesday, January 15, 2013

Playing with ESX: Setting up NAT in Linux (Basic Setup)

This post is about how to setup NATing in a Linux environment. If you have one central Gateway or Public IP and want all the internal machines to communicate to the outside world using Gateway's IP or the public IP, you need to setup a NAT for the same. Below mentioned steps will tell you how to configure the same.

Requirements:-
1. Gateway should have 2 nics, one to access internal network and other to access public network.
2. Internal machines should be connected via switch/hub to private nic of Gateway/Machine A.

In the setup mentioned below, I am using 2 VMs, config of each VM is as shown below:-

Config of Gateway:-
2 nics attached to VM.
First nic attached port-group "VM Network" which can access the public network.
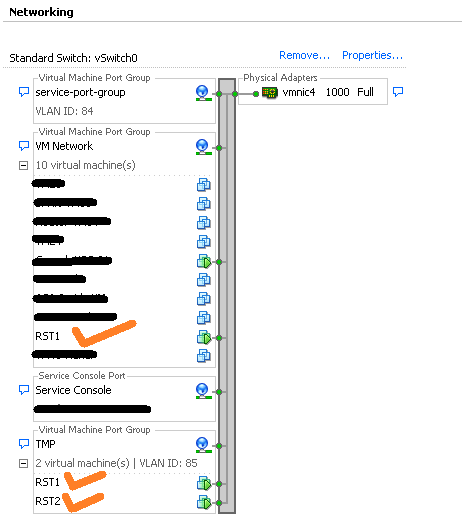
Second nic added port-group "TMP" which allows only VLAN 85 traffic. Hence its a private network.


Config of internal VM:-
Internal VM is having only 1 nic. This nic is assigned a port-group TMP such that its a part of private network and can access nic1 of Gateway VM.


Network setup for the above is as follows(Note that Gateway VM is named as RST1 and internal VM is named as RST2):-


Assign IP address to Nic1 on the Gateway machine which is a part of the private network.

 # This file describes the network interfaces available on your system  
 # and how to activate them. For more information, see interfaces(5).  
   
 # The loopback network interface  
 auto lo  
 iface lo inet loopback  
   
 # The primary network interface  
 auto eth0  
 iface eth0 inet dhcp  
   
 auto eth1  
 iface eth1 inet static  
 address 10.3.1.1  
 netmask 255.255.255.0   

To enable routing functionality on Linux, one needs to enable IP forwarding. You can do the same by entering the following command:-

 # echo “1″ > /proc/sys/net/ipv4/ip_forward  

To make the changes persistent across reboots, just add the following line in "/etc/sysctl.conf". Open this file in your favourite editor and add the following line:-

 net.ipv4.ip_forward = 1  

Reboot your machine.

Now you need to add Gateway functionality to this VM. For this, you need to add IPTable rules such that traffic coming on nic1 is sent out through nic 0. You can enter the following commands on the Linux terminal:-

 /sbin/iptables -P FORWARD ACCEPT  
 /sbin/iptables --table nat -A POSTROUTING -o eth0 -j MASQUERADE  

You can also add the above two lines at the bottom of "/etc/rc.local" file so that changes are present even after reboot. Now your basic NAT gateway is up and running.

To test the functionality of the Gateway, just provide the gateway address as the address of eth1 of Gateway and you will be able to connect to the outside world using Gateway. Below mentioned is the "/etc/network/interfaces" file of inside VM.

 # This file describes the network interfaces available on your system  
 # and how to activate them. For more information, see interfaces(5).  
   
 # The loopback network interface  
 auto lo  
 iface lo inet loopback  
   
 # The primary network interface  
 auto eth0  
 iface eth0 inet static  
 address 10.3.1.2  
 netmask 255.255.255.0  
 gateway 10.3.1.1  
   

Now if you will try to ping to outside world using this internal VM, you would be able to do so using the gateway.

Somethings you can try:-
Try configuring the Gateway such that you can SSH to the VMs behind the Gateway. You need to enable Port-Forwarding for the same. Happy configuring. :)

Last but not the least, I would like to thank my special friend for coming up with the idea to learn together and do this setup. Hopefully we both would do a lot more funny experiments in future. Thanks again to that friend. :)

Friday, December 21, 2012

Communication between VM’s in ESX on ESX setup

VMware ESX is a hypervisor from VMware which helps you to virtualize your infrastructure. Refer this link for more details.

Virtualizing the ESX hypervisor (i.e. running it as a VM) itself is a great way to experiment with different setups and scenarios without needing physical lab setup to perform the same. One can create his own mini-lab on the virtual ESX setup, add networking and storage to it, and thus can simulate a wide variety of test scenarios. Virtualizing the ESX also gives user the freedom to clone/snapshot the ESX. Thus, user can simply bring up this virtualized ESX on some other host and he has his whole lab setup, up and running within a few minutes.

VMware ESX has the capability of running “ESX as a VM” on top of the physical ESX host. This virtual ESX host has all the capabilities as that of the physical host. Thus, one can have a VM running inside a VM (virtual ESX) present on physical server.


VM’s communicate with each other through the virtual switches (vswitch) provided by ESX.  Considering the case of Virtual ESX on the physical ESX, one gets the following connectivity between the vswitches:-


Looking at the above setup, let’s have a scenario where machine A wants to communicate to machine B. Packets from machine A needs to travel through vswitch1 and vswitch2 to reach to machine B. Assuming there are no VLANs configured on the switches and all ports are a part of default VLAN (native VLAN), one might say that A will be able to communicate with B. But in reality, A is unable to communicate with B. If A sends a ping request to B, then only ARP resolution takes place (mac address of B gets learn at A). Ping’s reply is not received by A. The workaround to facilitate this communication is by putting vswitch1 on promiscuous mode. Let’s discuss about the cause of failure and how promiscuous mode solves the issue.


Cause of failure:-
VMware vswitch does not have the capability of mac learning. It maintains a table of the port to mac binding only for the VM’s present on the vswitch. Anything except that, it forwards through the uplink (physical NIC).


Promiscuous mode:-
It is a mode of operation which allows network device to intercept and read each network packet that arrives in its entirety. Enabling promiscuous mode on a switch makes the switch work like a hub.


How vswitch works while in non-promiscuous mode (default):-

For ARP request, since it’s a broadcast, following steps take place:-

  1.  Machine A sends an ARP broadcast.
  2. vswitch1 forwards this broadcast packet to all members present in that VLAN as well as on Physical NIC. This broadcast packet is received both by vswitch2 and a Physical Switch.
  3. On receiving the ARP request vswitch2 again broadcasts it and now it is received by machine B.
  4. Machine B sends a unicast reply. This reply is seen by vswitch2.
  5. Since the destination is not in its table, vswitch2 forward this response through physical NIC and is received at vswitch1.
  6. Vswitch1 finds the destination mac-address entry in its table and it forwards the reply to machine A. Hence, machine A learns the mac-address of machine B.


Next, if one tries to ping to machine B from machine A, following steps take place:-

  1. Machine A sends a ping request with destination mac-address of machine B (which it learnt from ARP broadcast).
  2. Since it is a unicast request, vswitch1 tries to find the destination mac-address entry in its table. It is unable to find that entry and hence it sends that packet out to physical switch through the NIC. This packet is not forwarded to vswitch2 and hence machine A is unable to communicate with machine B.


When vswitch1 is in promiscuous mode:-

ARP request is resolved in the same way as it’s resolved for non-promiscuous mode discussed above.

For ping request/response, following actions take place:-

  1. Unicast ping request is sent by machine A to machine B. This is received by vswitch1.
  2. Since vswitch1 is in promiscuous mode, all the ports on the switch are able to see the traffic of other ports who are part of the same VLAN. Therefore, this packet is sent out to both physical port and vswitch2.
  3. Vswitch2 finds port to mac entry for destination machine B and forwards the packet to machine B.
  4. Machine B replies to ping request. This packet is received at vswitch2.
  5. Since no entry for destination mac is found on vswitch2, it is forwarded to vswitch1.
  6. Vswitch1 is able to find the entry for destination mac in its table, and hence the response is forwarded to A. Thus, the response from B is received by A.

With promiscuous mode enabled, VM’s on the internal ESX host are able to communicate with the outside world.

However, drawback of promiscuous mode is that it will lead to increase in the traffic on vswitch and it will degrade the performance of the switch. One solution could be to put only the port which is attached to vswitch2 in promiscuous mode. But then, A needs to be a part of the same VLAN which that port allows. Another solution could be to use the advanced virtual switches available in the market which also perform mac learning. Some examples of the advanced switches are VMware DVS, Cisco’s N1KV, IBM DOVE, etc.

References:-

Monday, October 10, 2011

Disable top bar while running VMPlayer in fullscreen mode

Hi, In this post I am going to tell you how to disable the vmplayer's top bar which appears when we run the vmplayer in fullscreen mode.

For windows systems:-

All you have to do is to edit the preferences.ini file.

My user account has the name "rahul". So I had the file located at "C:\Users\Rahul\AppData\Roaming\VMware"

Open this file and add the following line to it:-

pref.vmplayer.fullscreen.nobar="TRUE"

For Linux systems:-

Find preferences at location "/home/user/.vmware/preferences"

So just type following command and add the line to that file:-

user@ubuntu32$ vi /home/user/.vmware/preferences

Add the following line to the file:-
 
pref.vmplayer.fullscreen.nobar="TRUE"

Save it and now run a vm in vmplayer in fullscreen. You will not see the top bar.

If you see an error or the bar not disappearing, then see the vmware.log file for detailed description on the error which occurred.