One can share the internet with his friends using the Internet Connection Sharing option available in Windows.
Follow the below steps to share your internet:-
SERVER CONFIGURATION:-
Step1:-
On the server, you need to have 2 network adapters, one for LAN and the other one for Internet.
Step 2:-
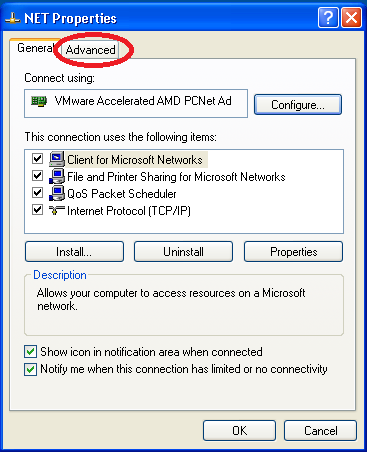
You need to share the internet of the adapter which is directly connected to Internet. Here its the adapter with name "NET". Right click on it, and goto properties.
Step 3:-
Now in properties, click on the advanced tab.
Step 4:-
Now in this, you will see the option of "Internet connection sharing". Select it and click "Ok".
Note that after you click OK, the IP address of LAN will be reset to 192.168.0.1/24 . So you need to change the IP address of LAN as per your address.
CLIENT COFIGURATION:-
Step 1:-
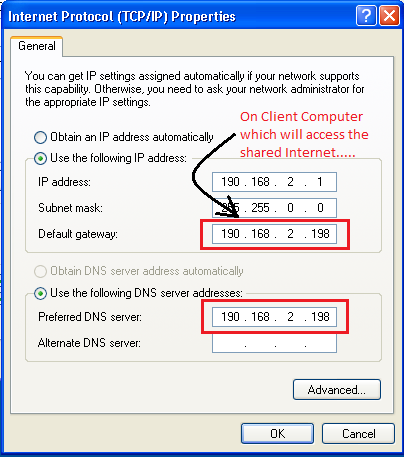
Goto the remote machine which wants to access internet via server. Open its network adapter properties.
Step2:-
Now in this, enter the IP address of server at 2 locations:- One at Gateway and other at DNS server.
Click OK.
Now you will be able to access internet directly without needing to enter the proxy. Remove the proxy settings if you have entered them in web browser.
TRICK:-
I have used this method a lot at hostel to get internet from my friends. I was in NBH and I used to download a lot of stuff using this. They don't know about this. So I used to modify the settings of their server and access internet from them. They couldn't find me and they thought that their internet has gone slow. There were 4-5 servers there and I had used net from each one of them. I loved being there as each one had atleast 600 Kbps connection and I used to get internet from each one of them. I would run 2,3 virtual machines and would use different server in each of them. Then I was able to download different stuff from different servers. So virtually I was having a net connection of about 5 Mbps of my own.... :). I used download a lot of stuff using this. Its a nice trick.... :)


