Linux kernel has an inbuilt support for providing switching capability. In this post, I am going to define a simple a simple network to setup and then create the same using Linux VMs on ESX host.
Problem definition:-
Create a basic bridge(switch) and allow communication between the two VMs connected to that switch/bridge. In this, the switch will be created on a VM. Below mentioned diagram lists the network setup details:-
Requirements:-
Since we are using ESX host as the hypervisor, we need an ESX host to run the virtual machines, and 3 linux virtual machines on it.
Machine(Bridge VM) which will act as bridge:-
This VM needs to have 2 vnics.
Rest 2 Traffic VMs(VM1 and VM2):-
These VMs need to have atleast one vnic.
Setup Part:-
Create 3 VMs on the ESX host. Below is the snapshot from my setup:-
Next install bridge-utils on the bridge-vm(Switch_Test VM as per my setup). These bridge-utils provide the functionality to create/delete/modify the virtual switches on the linux host.
Now make sure that no ip-address is assigned to the two nics of switch-vm. Instead provide the following config in "/etc/network/interfaces" file(my linux OS is ubuntu).
Once this is done, you need to create your first switch. You can create that using the following commands:-
For more details, see the manpage of brctl.
Now you need to add the two nics of switch-vm to the bridge.
Now you need to zero-ip the interfaces added.
Once added, you need to bring up the br0.
Once done, your bridge is ready. You just need to plug the machines as mentioned in the setup diagram(problem statement diagram).
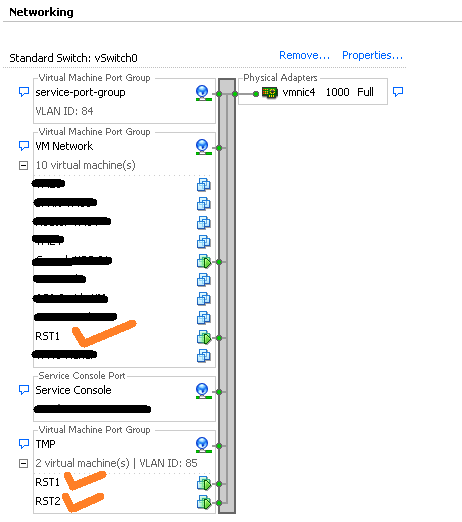
Main challenge here is to have the TrafficVM's connected to the individual nic of switch and making sure they cannot talk with each other directly. To do this, I have created 2 port-groups, each having separate VLAN and then applied them to the VM's vnics. Mentioned below is the pic of vswitch network on ESX host.
Simplifying the above network connectivity diagram, I have a network setup as depicted in the diagram below:-
Make sure that both the port-groups created are in promiscous mode, otherwise packets will not reach to the interfaces of switch-vm.
Now assign IP addresses to VM1 and VM2 such that they both are in the same subnet. Send a ping from VM1 to VM2. You will be able to communicate from VM1 to VM2 and vice-versa via switch running inside switch-vm.
Setup Part:-
Create 3 VMs on the ESX host. Below is the snapshot from my setup:-
Next install bridge-utils on the bridge-vm(Switch_Test VM as per my setup). These bridge-utils provide the functionality to create/delete/modify the virtual switches on the linux host.
root@switch-test# apt-get install bridge-utils
Now make sure that no ip-address is assigned to the two nics of switch-vm. Instead provide the following config in "/etc/network/interfaces" file(my linux OS is ubuntu).
 # The loopback network interface
 auto lo
 idace lo inet loopback

 auto eth0
 iface eth0 inet manual

 auto eth1
 iface eth1 inet manual
Once this is done, you need to create your first switch. You can create that using the following commands:-
root@switch-test# brctl addbr br0
For more details, see the manpage of brctl.
Now you need to add the two nics of switch-vm to the bridge.
 root@switch-test# brctl addif br0 eth0
 root@switch-test# brctl addif br0 eth1
Now you need to zero-ip the interfaces added.
 root@switch-test# ifconfig eth0 0.0.0.0
 root@switch-test# ifconfig eth1 0.0.0.0
Once added, you need to bring up the br0.
root@switch-test# ip link br0 up OR root@switch-test# ifconfig br0 upOnce done, your bridge is ready. You just need to plug the machines as mentioned in the setup diagram(problem statement diagram).
Main challenge here is to have the TrafficVM's connected to the individual nic of switch and making sure they cannot talk with each other directly. To do this, I have created 2 port-groups, each having separate VLAN and then applied them to the VM's vnics. Mentioned below is the pic of vswitch network on ESX host.
Simplifying the above network connectivity diagram, I have a network setup as depicted in the diagram below:-
Make sure that both the port-groups created are in promiscous mode, otherwise packets will not reach to the interfaces of switch-vm.
Now assign IP addresses to VM1 and VM2 such that they both are in the same subnet. Send a ping from VM1 to VM2. You will be able to communicate from VM1 to VM2 and vice-versa via switch running inside switch-vm.


