Tuesday, November 22, 2011

How to increase trial period of Windows 7 or Windows Server 2008

Usually Windows 7 comes with a default trial period of 30 days. People don't know that it can be extended upto 120 days. So I am going to discuss about that.

Windows manage the license of Windows 7 or Windows Server 2008 using a tool called "Software Licensing Management Tool". Its a vb script whose default location is "C:\Windows\System32" and is a file named "slmgr.vbs". SLMGR itself stands for Software Licensing Manager.

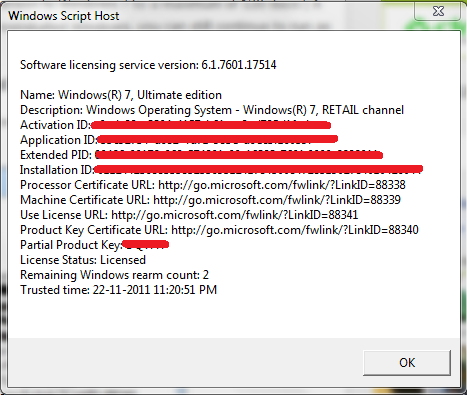
If you want to see the activation status of your machine, just run the following command either in command prompt or in Run and type the following words: "slmgr.vbs /dlv"


Now you will get the detailed description about your license.

If you want to see all the parameters accepted by slmgr.vbs, then  instead of /dlv, just type slmgr.vbs in RUN and you will get all the options listed in the prompt which will come.

How to increase the trial period to 120 days?

One thing is to be noted as seen on the above picture, there is something called "Windows rearm count" listed with some figure in front of it. This is the matter of interest.

Actually Windows provide you 3 rearm counts. When you perform fresh installation of windows, the rearm count is set to 3 and a trial period of 30 days is given to you. On the completion of trial period, you are asked to either activate or you can increase the trial period.

For increasing the trial period, you need to perform the following steps:-

1. Open Command Prompt in Administrative mode, i.e., "Run As Administrator"


2. Now type the following command in the command prompt:-    "slmgr -rearm"
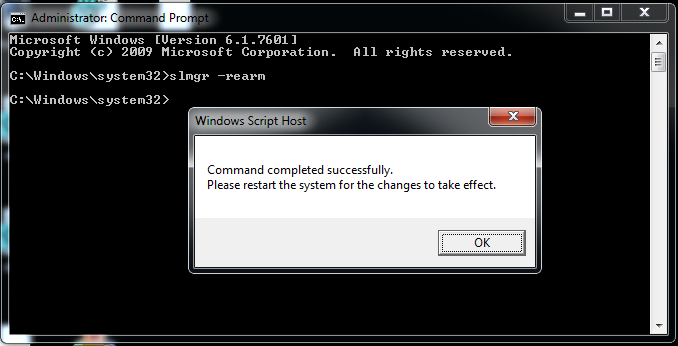

On successfull run of the command, a dialog box will appear asking user to restart the machine. On restarting, you will see your trial period renewed by 30 days.

This command you can run for a max. of 3 times, ie 30 days(initial) + 30*3 = 120 days of trial period of windows.

If you want to know how many rearm counts are remaining, then run the command in RUN "slmgr.vbs /dlv" and you will get the rearm count in the information displayed as shown in the second diagram above. Note that there is gap in between "slmgr.vbs" and "/dlv".

Thanks for reading..... :)
If you have any queries, then do ask. I would be happy to help.

Monday, November 21, 2011

Installing and Configuring RSH on Linux

I installed and configured RSH on CentOS release 5.5 . The steps would be almost same for all the other linux distros.

First you need to have xinetd installed. For that fire the following command:-

user@centos# yum install xinetd

Once its installed, you need to install rsh-server onto your machine. For that enter the following command:-

user@centos# yum install rsh-server

Now you need to Edit /root/.rhosts to add lists of hosts that can access without password. If you want to allow access to everyone without password, you need to put '+' in the file. A '+' indicates allowing everyone.
To do this, you can either modify the file by opening it or just enter the following command:-

user@centos# echo + > /root/.rhosts

Now you need to modify the permissions of .rhosts file. Enter the following command:-

user@centos# chmod 600 /root/.rhosts


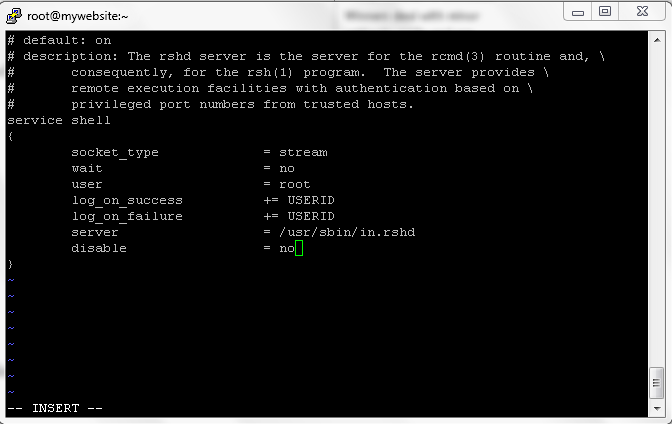
Now you need to allow RSH , RLogin and Rexec to be used. For that you need to modify the /etc/xinetd.d/rsh , /etc/xinetd.d/rlogin  and /etc/xinetd.d/rexec file. Open these files one by one and then set the "disable=no"

Here is an example for modifying the rsh file:-

user@centos# vi /etc/xinetd.d/rsh


Similarly do for the rlogin and rexec file.
Once these are done, now you need to modify the /etc/pam.d/rsh file to allow passwordless rsh to the machine.

You need to modify the following line:-

     BEFORE: auth    required        pam_rhosts_auth.so
     AFTER : auth    required        pam_rhosts_auth.so promiscuous
Now you are done. You need to restart the xinetd service.
 
user@centos# /etc/init.d/xinetd restart
Now run the rsh command with the other commands and you will be able to successfully
execute them.
 If there are any warnings or errors as you are trying to access using the root 
privileges, then you need to modify the /etc/securetty file. Add rsh and rlogin 
to the bottom of that file.
Now you would be able to successfully perform rsh to the machine. 

Monday, November 14, 2011

Package required to make calls from "Lua" to "C" and vice-versa

Lua provides the facility to make calls to C programs and also has the ability to be called from the C program.

I got a problem of being unable to get the required liblua5.1.so files which are essential for this type of communication to happen. So I finally found out what package I need to install to get this working.

One needs to install the "liblua5.1-dev" package and with this all the required files will be updated. You just need to fire this command:-

rahul@ubuntu32$ sudo apt-get install liblua5.1-dev

Once its installed, you can see the path of all the shared libraries "liblua5.1.so" by running the following commands:-

rahul@ubuntu32$ sudo updatedb
rahul@ubuntu32$ locate liblua | less

If you want to get the path of lua.h file, fire the command:-

rahul@ubuntu32$ sudo updatedb
rahul@ubuntu32$ locate /lua.h

Now you have the path of Include files and the shared libraries. Just create the shared library from the "C" program and then run the lua program. You would be able to call C program from the lua program.

A nice tutorial about this is given on the website "http://www.troubleshooters.com/codecorn/lua/lua_lua_calls_c.htm". Do have a look there for more details.


Wednesday, November 9, 2011

Installing Lua on Linux

For installation, download the binaries, build them and install them. The steps for building and installing are listed below.

Download the Lua binaries from the site:-
1. Download the source: http://www.lua.org/ftp/lua-5.1.4.tar.gz
2. Extract the tar ball
3. Run this command from lua-5.1.4 directory: "make linux test"
------------------------------------------------------------------------------------------------------------------------
If you get an error that readline or history.h not found, then try installing the following package:-

sudo apt-get install libreadline6-dev
------------------------------------------------------------------------------------------------------------------------
To check what files exist in a package, use the following command:-
dpkg-query -L <package name>
Like:-
dpkg-query -L libreadline6

If you don’t find any header files and only .so files, then it means you are having the shared libraries and not the source. So you need to install the source files as well.

------------------------------------------------------------------------------------------------------------------------
To get the list of packages and their names if you don’t know, then one can search using the following command:-
sudo apt-get cache search readline

This will give you the list of all the packages containing the name readline
------------------------------------------------------------------------------------------------------------------------

How to build and install binaries from the package:-
Once the binaries are downloaded and the command “make linux test” is run, you need to now install the generated files.

For that enter the following command:-
sudo make install

This will install the Lua binaries to the required path.

Now you can run the files using the terminal.
user@ubuntu32$ which lua
/usr/local/bin/lua
user@ubuntu32$ lua
>

Wednesday, October 12, 2011

Some interesting facts about windows 8


To understand this article, you first need to know few things…..

First one is about UEFI(Unified Extensible Firmware Interface) which is nothing but the replacement to the traditional BIOS which has started to occur.

One can have a good knowledge about it from the following link…. It’s a good link to know about UEFI.

Important Point:-
One feature of UEFI is that it allows firmware to implement Security Policies.

Now why is this UEFI important???
UEFI secure boot is part of Windows 8 secured boot architecture
So, when windows 8 will be launched, the laptops which will be coming with pre-installed Windows 8 will have UEFI instead of traditional BIOS.

Here is a nice article about the boot process of win8:-

So why to be concerned??
·          
      Windows 8 utilizes secure boot to ensure that the pre-OS environment is secure
·         Secure boot doesn’t “lock out” operating system loaders, but is a policy that allows firmware to validate authenticity of components

Usually if we have a laptop with windows installed on it and want to install Linux on it, then we simply either format or create new drive and install Linux onto that. And then it modifies the Boot Loader/System Loader and we get both the OS working.

But with PC’s having Windows 8 installed, if you have UEFI instead of BIOS, you won’t be able to do so. As it now uses UEFI and it has security policies configured which will prevent you from booting any other OS than the authorized ones.

Microsoft can require that hardware vendors include their keys (for secure booting). Their competition can't. A system that ships with Microsoft's signing keys and no others will be unable to perform secure boot of any operating system other than Microsoft's. No other vendor has the same position of power over the hardware vendors. Red Hat is unable to ensure that every OEM carries their signing key. Nor is Canonical. Nor is Nvidia, or AMD or any other PC component manufacturer. Microsoft's influence here is greater than even Intel's.

Linux has no support for UEFI by now and it would be an issue for linux to add support for it as soon as possible and also make vendors to add their certificates in the authorized list.

Here is a nice article on this topic:-

Monday, October 10, 2011

Disable top bar while running VMPlayer in fullscreen mode

Hi, In this post I am going to tell you how to disable the vmplayer's top bar which appears when we run the vmplayer in fullscreen mode.

For windows systems:-

All you have to do is to edit the preferences.ini file.

My user account has the name "rahul". So I had the file located at "C:\Users\Rahul\AppData\Roaming\VMware"

Open this file and add the following line to it:-

pref.vmplayer.fullscreen.nobar="TRUE"

For Linux systems:-

Find preferences at location "/home/user/.vmware/preferences"

So just type following command and add the line to that file:-

user@ubuntu32$ vi /home/user/.vmware/preferences

Add the following line to the file:-
 
pref.vmplayer.fullscreen.nobar="TRUE"

Save it and now run a vm in vmplayer in fullscreen. You will not see the top bar.

If you see an error or the bar not disappearing, then see the vmware.log file for detailed description on the error which occurred.

Wednesday, September 28, 2011

Creating local git repository server

I tried to setup a local git code repository for managing the code and had some issues with gitosis. Finally I came up with a much simpler way to create a git repository and host it on the local server.

One can follow the steps as listed below and can setup a local git server. I used Ubuntu 10.04 for this and also tried on Ubuntu server 10.04 and it works on both.

First thing you need to do is to install git on your system. For that simply run this command:-

user@ubuntu32$ sudo apt-get install git-core

Now git is installed onto your system. Now create a directory in which you will keep your code:-

user@ubuntu32$ mkdir git_repo  
user@ubuntu32$ cd git_repo
user@ubuntu32:`/git_repo$ git init

Now add all the project files into the directory. I copied all the files I want to add to the repository.

user@ubuntu32:`/git_repo$ cp -r /home/user/projectA/* /home/user/git_repo

Now we need to add the files...

user@ubuntu32:`/git_repo$ git add .

Now we need to commit the changes. For that enter this command:-

user@ubuntu32:`/git_repo$ git commit -a -m "My first commit"

Now your files are added to the git repository.

Now to create a hosted repository of this source code, perform the following actions:-
First you need to copy the .git contents which can be checked out at later stages by users for cloning the directory. So enter the following command:-

user@ubuntu32:`/git_repo$ cp -r /home/user/git_repo/.git  /home/user/hostedgitrepos/git_repo.git

Now your universal git repository is git_repo.git and you can clone it from any machine. You just need to have access to that machine and rights to access them.

You can clone it on other machine using the following command:-

aa@fed$ git clone user@<server_machine_name_or_ip>:/home/user/hostedgitrepos/git_repo.git

Now you will see the directory cloned onto your machine.

Similarly one can push the changes to the git repository or can pull the updated source code in the same fashion. 

Thanks for reading..... :)